Translate
Friday, 2 April 2021
Threading Errors Video
Friday, 26 March 2021
Knitting Patterns
Aesculus Shawl
Hugs by Post Shawl
Lace Draw-String Bag
Needle Roll
Sunday, 21 March 2021
Yarns I Like for Tablet Weaving
Recently, I wrote about and made a video about the criteria I use when I'm selecting yarn for tablet weaving. In this post, I thought I'd tell you about some of the yarn that I like using myself. I'm not sponsored by any of the companies I mention and everything I say here is my personal opinion.
When I weave rigid heddle and tablet woven bands for the sale box I take to events with me (in non-plague years!), I mostly use Drops Karisma DK. It's 100% wool, 100m/50g and comes in a good range of colours. It's also pretty economical, especially if you buy it during one of the Drops discount events that happen several times a year.
I like to use King Cole Merino Blend 4-ply when I'm weaving trim. It's 100% superwash wool (meaning that it's machine washable)and 180m/50g. It's the yarn I used when I wove the samples for Noughts and Crosses and Tic Tac Toe and makes a lovely trim, as it makes bands that weave up fairly fast, but are less bulky when stitched to a garment than DK.
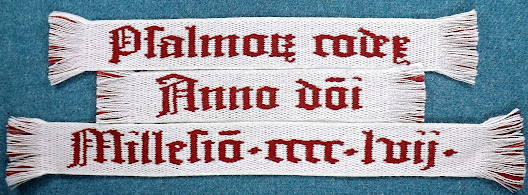
For the samples I make for my books, I like World of Wool Weaving Yarns, although at the time of writing, it has been discontinued. It's 100% wool and 8000m/1000g and came in black, white and orange. To extend the range of colours, I've been using the white yarn for natural dyeing. For one of the samples for my book Tablet Weaving in Theory and Practice: Double-Face Inscriptions, I used Brazilwood dye and an alum mordant from George Weil to get the lovely red colour that I needed.
Lastly, Piper's Silks. For very special bands, I use their 80/3 spun silk, which is 75m per spool. It's beautifully smooth and because of its tight twist, it stands up to tablet weaving really well. It's pretty fine, so when I use it to make a belt, I laminate together several layers of buckram, then sandwich that between the band and cotton twill tape and stitch them together. This yarn comes in a great range of vibrant colours and the woman who runs the company is an absolute pleasure to work with.
Saturday, 13 March 2021
Choosing Yarn for Tablet Weaving
I've made a new video and added it to the beginning of the tutorial page here. It's all about the things I consider when choosing yarn for a new band.
Saturday, 27 February 2021
Correcting Errors Video!
I found that I really enjoyed making a video about using TDD last week, so I thought I'd make another! This time it's about the technique I use for stripping out weft when I want to reweave a large section of a band. I've added it to the top of the page I've made for it here on my blog, too.
I have several more videos I'm planning to make and I hope to sort out a set up at some point so that you can actually see me weave. There's a semi-continuous warping technique that I've been wanting to share with you for a long time.
Friday, 26 February 2021
Correcting Errors
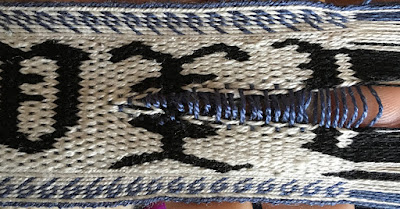
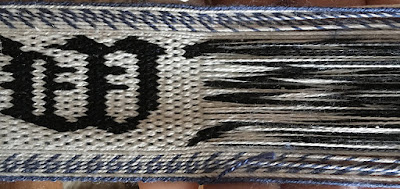
If you are unhappy with your band or you want to correct a mistake, you can turn the tablets in the opposite direction to the way you turned them during weaving to unweave your work, taking the weft out of the shed as you go. If you need to go back more than a few picks, you might want to consider stripping out the weft to make this process easier.
Pull the warp threads apart to the side, towards the selvedges to expose the weft.
Snip it with a pair of scissors (being very careful not to nick any warps!) to a point a few picks above where you want to restart your band.
Pull out each piece of weft with your fingers or a pair of tweezers.
Turn the tablets until the twist is gone between them and the final piece of weft in the shed just above where you plan to restart.
Unweave the final few picks by turning the tablets in the opposite direction to the way you turned them when you wove that section. Carefully remove the weft from the shed each time it is exposed and the shed is open. This will give you a short section of weft attached to the band.
Join a new weft by placing it into the shed with a short tail sticking out of the band, then turn the tablets according to your draft and place the old weft tail through the shed alongside the new weft to lock it in place. Weave with the new weft and the old weft tail in the shed together for a pick or two, then continue on with only the new weft. Trim away the tails of the new and old wefts to neaten up the band.
Sunday, 21 February 2021
Tablet Weaving Draft Designer Updates
We've been wearing our bug squishing boots again!
This weekend we've:
- Fixed an error that caused the horizontal ruler to sit behind the threading diagram, rather than on top of it
- Sorted a few spelling errors
- Updated the copyright notice to read 2015-2021
- Changed the instructions link to point to a new version
- Fixed a bug causing canvas size change problems when the rulers would be off the edge of a new draft
Monday, 15 February 2021
Getting the Most from Tablet Weaving Draft Designer
As some readers may already know, Tablet Weaving Draft Designer (TDD for short) is a free, browser-based tablet weaving drafting tool, which you can also use offline if you already have it loaded on your device. It's a joint project by my husband, James, and I that we started back in 2015 as a way for me to draft out my tablet weaving ideas more easily. It's changed quite a bit in the intervening years, most significantly over the Christmas holidays of 2020, when James did a full rewrite of the code and we implemented some new features.
The TDD Control Panel has nine sections, but you don't have to use all of them to create your draft if you don't want to; the bare minimum you need is the Controls section at the top and the Palette section further down. Click on the name of each section or the plus symbol next to the name to expand that section of the Control Panel. Click on the name or the minus symbol next to the name to collapse it again.
Draft Name
Type the name of your draft in the empty box at the top of the Control Panel. This will be the name used for any files or images you save or export. If you leave this empty, TDD will use the file name "draft" instead.
Controls
Enter the number of picks (rows) you want the turning diagram to have, the number of holes the tablets will have and the number of tablets you want, using a keyboard to fill in the boxes or with the plus and minus buttons on either side of the boxes. You can always change these values later if you need to. TDD will add any extra picks to the top of the turning diagram and any extra tablets to the right of the threading diagram. *New for 2022: you can now lock and unlock the draft using a tick box here.
Rulers
TDD comes equipped with horizontal and vertical rulers, the position of which can be controlled by entering a value in the text box or by using the plus and minus buttons. The horizontal ruler is particularly helpful if you weave from your computer screen, as you can advance it up the page to help you keep track of your position in the turning diagram. I like to use the vertical ruler to mark the centre of the draft if it is a really wide one with a line of symmetry down the middle. You can also use the vertical ruler to mark the next tablet you need to thread in the threading diagram when you warp your loom. You can enter a minus number for the horizontal ruler position to make it appear in the threading diagram rather than the turning diagram. If you would prefer not to use the rulers, you can remove them by clicking to un-tick their boxes. I always do this before exporting the draft as an image file.
Display
You can un-tick the Show Threads box to remove the thread ovals from the threading diagram. This is helpful if there's an error in your turning diagram that you can't pin down, as it lets you see the pattern of forward and backward turns more easily.
*New for 2022: You can now use the Show Turning Diagram tick box to hide or show the turning diagram.
Tick the Show Threading Diagram box to include the threading diagram at the bottom of your draft. If you're generating a large number of drafts that all use the same threading, leaving it out after the first draft will save you some space on your page.
If you prefer to mark the points in the turning diagram where the turning direction of a tablet changes, rather than which tablets are turning backward or forward, tick the Show Reversals box to add a red line to the draft at these points.
*New for 2022: You can now choose whether the tablets in the draft are labelled clockwise or anti-clockwise. This will also be reflected in the text description for the draft.
The Show Text Description box will produce a set of written instructions equivalent to your draft, which will appear below it. The threading diagram is described tablet by tablet, with hexadecimal codes and names (more information about these names is given below) for each of the thread colours, with a list of turning instructions broken into groups of tablets below it. The description below is the text version of the example draft above:
- Threading:
- Z threaded tablet
- Yellow (#ffff00)
- Flirt (#990099)
- Yellow (#ffff00)
- Flirt (#990099)
- Z threaded tablet
- Flirt (#990099)
- Yellow (#ffff00)
- Flirt (#990099)
- Yellow (#ffff00)
- S threaded tablet
- Flirt (#990099)
- Yellow (#ffff00)
- Flirt (#990099)
- Yellow (#ffff00)
- S threaded tablet
- Yellow (#ffff00)
- Flirt (#990099)
- Yellow (#ffff00)
- Flirt (#990099)
- Turning:
- 4F
- 4F
- 4B
- 4B
- 4F
- 4F
- 4B
- 4B
The Backwards Turn Saturation slider can be used to increase or decrease the level of contrast of the grey background squares on the turning diagram. If you slide it all the way to the left, you can make the background of all the squares white instead to get a quick preview of what the draft might look like when woven.
When I'm creating a draft for weaving double-face, I un-tick the Show Threads tool and set the Backwards Turn Saturation to about 75%, as I'm using the draft to show the placement of the background colour and contrast colour rather than what the individual tablets are doing, but I still want to be able to see the borders of the boxes on the turning diagram. This charting method is also useful in producing drafts for brocaded bands.
 |
| A simple draft for either brocade or double-face |
Since the big December re-build, the Visual Scale of the draft can now be used to both increase the size of the draft on your screen and decrease it (if you input a negative number into the box), which is really helpful for getting an overview of very large drafts.
Repeats
We initially took out this tool during the update, as we weren't happy with the way it was functioning. Now that it's back, it works a bit differently, but it's now no longer possible to use it to generate a band mock-up that won't work when woven.
Select the Show Repeats box and TDD will add a mock-up of your band to the right of your draft; it will look the the same as your draft, but all the squares will have white backgrounds and it will be missing any red lines or rulers. Specify which picks you want to be included in your mock-up using the Repeat Start and Repeat End fields and TDD will show you what a band would look like if you repeated that turning sequence using the threading diagram you have input. You can change how many times TDD repeats those picks using the Number of Repeats field. More information about how the Repeats tool works can be found here.
Resets
Treat the Reset All button with caution! It clears everything away and resets your draft to 1 pick high and 1 4-holed tablet wide at 0 Visual Scale. It's really helpful if you want to start a new draft from scratch, but there's no undo function, so always save your work before using it.
*New for 2022: You can now use the Reset Palette button to set the palette back to its default settings, without making any other changes in the draft.
The Clear Pattern button will reset your turning diagram to the default, with every square set to forward turn, with no turning reversals, but won't change your threading diagram or the number of picks in it.
Palette
To change the colours of your threads, click the Foreground Colour you want, then click on the thread you want to change in the threading diagram. If you want that tablet hole to be empty so you can produce a vacant-hole draft, select "None" from the left side of the Palette before clicking on the threading diagram. This will give you an empty box instead of a thread for that tablet hole on the threading and turning diagrams. The numbers underneath the colours in the Palette tell you how many times that colour is used in the threading diagram to make warping for your band easier.
The Palette will display a Colour Name for the colour you have selected, taken from an open source java-script library by Chirag Mehta. This colour name is also used in the Text Description below the draft, if you have it turned on.
If the colours in the Palette aren't to your preference, you can adjust them by selecting a colour's box and changing it using the Red Green Blue sliders below it. Alternatively, you can enter the RGB values for the shade you want next to the sliders. If the colour you have changed is used in your draft, the draft will be automatically updated with your changes.
Export
TDD can export images for both your draft and for your pattern repeat mock-up. Fill in the number of pixels wide you want the image to be in the box, then click on any of the three buttons below it to download your image. If, for example, you want your image to be 5cm (2 inches) wide with a resolution of 250dpi, enter 500px in the Export Width box.. TDD can export your draft as an .svg file, a .jpeg file or a .png file. The file name will be the same as the name you gave the draft at the top of the Control Panel. The image will be the same as your draft, so if you have the rulers or red reversal points turned on, they will be included in your exported image.
Files
One of the big behind-the-scenes changes that we made this past December is the way TDD saves files. Previously, it used the .json format which produced a large amount of coded information, the vast majority of which would be gibberish to the lay-person. The new .tdd files are much shorter and actually resemble your draft if you open one up in a text editor (like Notepad++, Sublime Text, Emacs, Vi, Atom, or any programmers' editor); if you do open one, make sure that you don't accidentally change the file extension or TDD won't be able to open it again.
You will still be able to open any of the .json files you previously made using TDD, but you will only be able to save in the new format. We don't intend to remove this capability to open old files, so there's no rush to convert them.
When you click the Save button, TDD will download the .tdd file for your draft to your device using the draft name you specified at the top of the Control Panel, in the same way as the Image Export tool. Clicking the Choose File button will open an Open File dialogue box. The text below is the contents of the save file for the example draft above.
//\\
//\\
\\//
\\//
//\\
//\\
\\//
\\//
7997
9779
7997
9779
ZZSS
0 - #ffffff
1 - #000000
2 - #ff0000
3 - #009900
4 - #0000ff
5 - #dddddd
6 - #999999
7 - #ffff00
8 - #00ffff
9 - #990099
a - #ff8800
b - #ff8888
Sunday, 14 February 2021
Tablet Weaving Draft Designer Update: Exporting an Image of Your Pattern Repeats
At the request of a user, you can now use TDD to export and image of your pattern repeat mock-up as well as of your draft. You can find the tool for this in the Control Panel under Export, below the buttons for exporting an image of your draft. It gives you the option to download it as an .svg, a .jpg or as .png file.

